Right here I’m demonstrating the best way to adorn sugar cookies. I’ll stroll you thru 4 easy and approachable strategies which are an incredible place to begin for those who’re new to cookie adorning. In case you’re intimidated or nervous about making royal icing and attempting your hand at creating festively adorned cookies, this publish and video tutorial are for you.

Whereas I like a very good baking problem, in relation to adorning baked items, I prefer to maintain issues easy. Very like the Piping Ideas 101 tutorial I did for five fundamental (but stunning) methods to pipe frosting onto cupcakes, consider this as your Sugar Cookie Adorning 101 course.
Use These Adorning Methods on Any Lower-Out Cookies
The cookies you see listed here are my traditional sugar cookies. These cookies, with their irresistible buttery vanilla taste and delicate, thick facilities, are a beautiful base for adorning with icing. They maintain their form when baking and have a flat floor that’s good for adorning.

These cookie adorning strategies can all be used on different varieties of cut-out cookies, too:
Now Let’s Discuss About Royal Icing
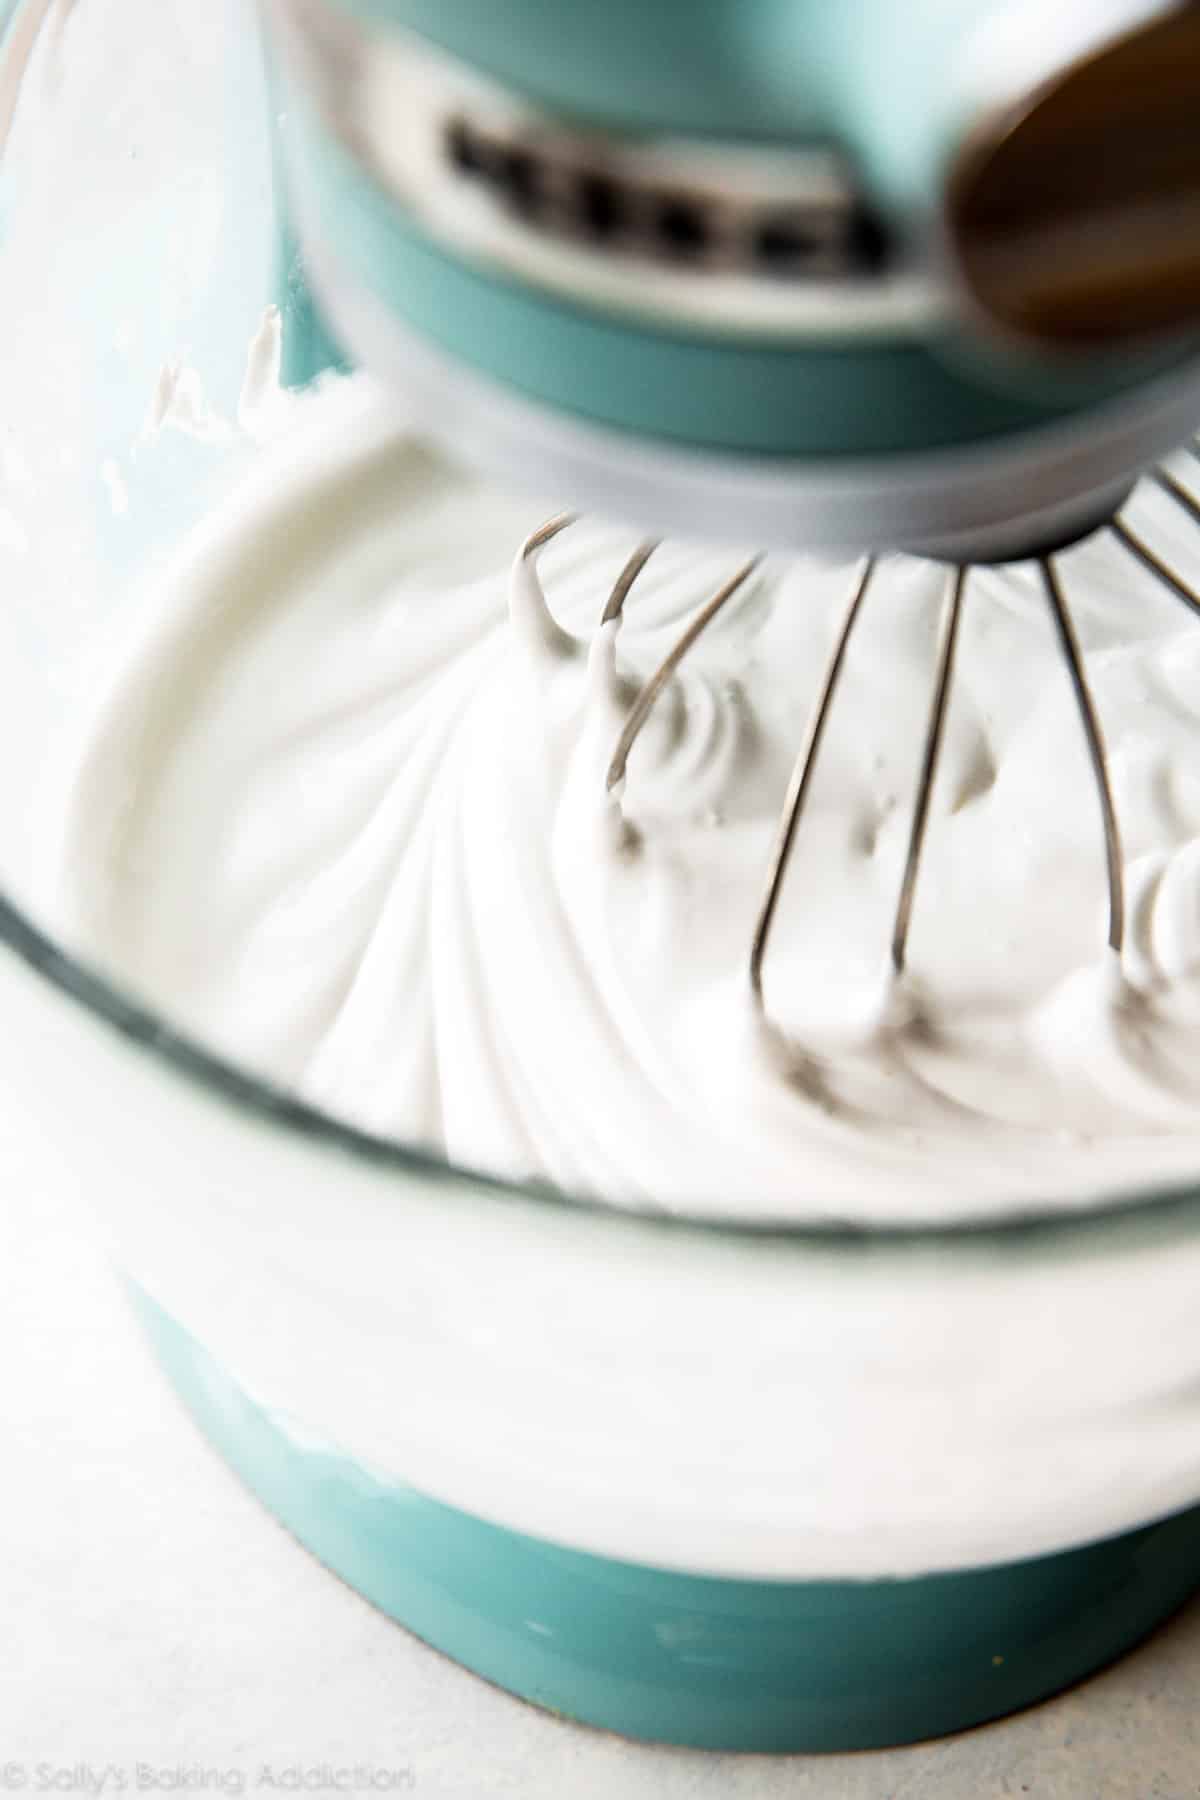
I’ve a separate publish all about royal icing with a lot of recommendations on the best way to make it, however I’ve additionally included a printable recipe card beneath. Royal icing is my most popular sugar cookie icing as a result of it’s simple to work with, dries inside 1–2 hours, and doesn’t harden into cement (it’s on the softer aspect!).
I particularly love this specific royal icing as a result of you should use it for each outlining and flooding your cookies.
It’s made with meringue powder, which takes the place of the uncooked egg whites present in conventional royal icing recipes. You’ll find meringue powder in some baking aisles, most craft shops with a baking part, and on-line; one container ought to final you a very long time.
Royal Icing Different: Glaze Icing
In case you’d choose to go along with one thing that’s just a little simpler to make, strive my simple cookie icing. This opaque glaze-like icing doesn’t set/dry as shortly as royal icing (it takes about 24 hours) and it’s not ultimate for piping sharp element. That being stated, generally it’s simply the extra handy possibility!
Tint the Icing and Fill Your Piping Luggage
You may maintain the icing white or tint the icing with gel meals coloring. To paint it, divide it into small bowls. Add gel meals coloring to every bowl and blend nicely.
Seize a piping bag for every colour of icing. Match every with a coupler and piping tip. I usually use Wilton piping tip #4 for each outlining and flooding the cookie with icing. This can be a great fundamental piping tip to have in your assortment. Once I’m utilizing a number of colours with the identical piping tip, I at all times use couplers. This makes it simple to swap piping ideas among the many totally different coloured luggage of icing. Spoon the icing into the piping bag.
- Clips: I take advantage of these clips to safe the tip of the piping bag, so the icing doesn’t leak out the tip of the bag.

Now let me present you the best way to adorn sugar cookies with 4 easy strategies.

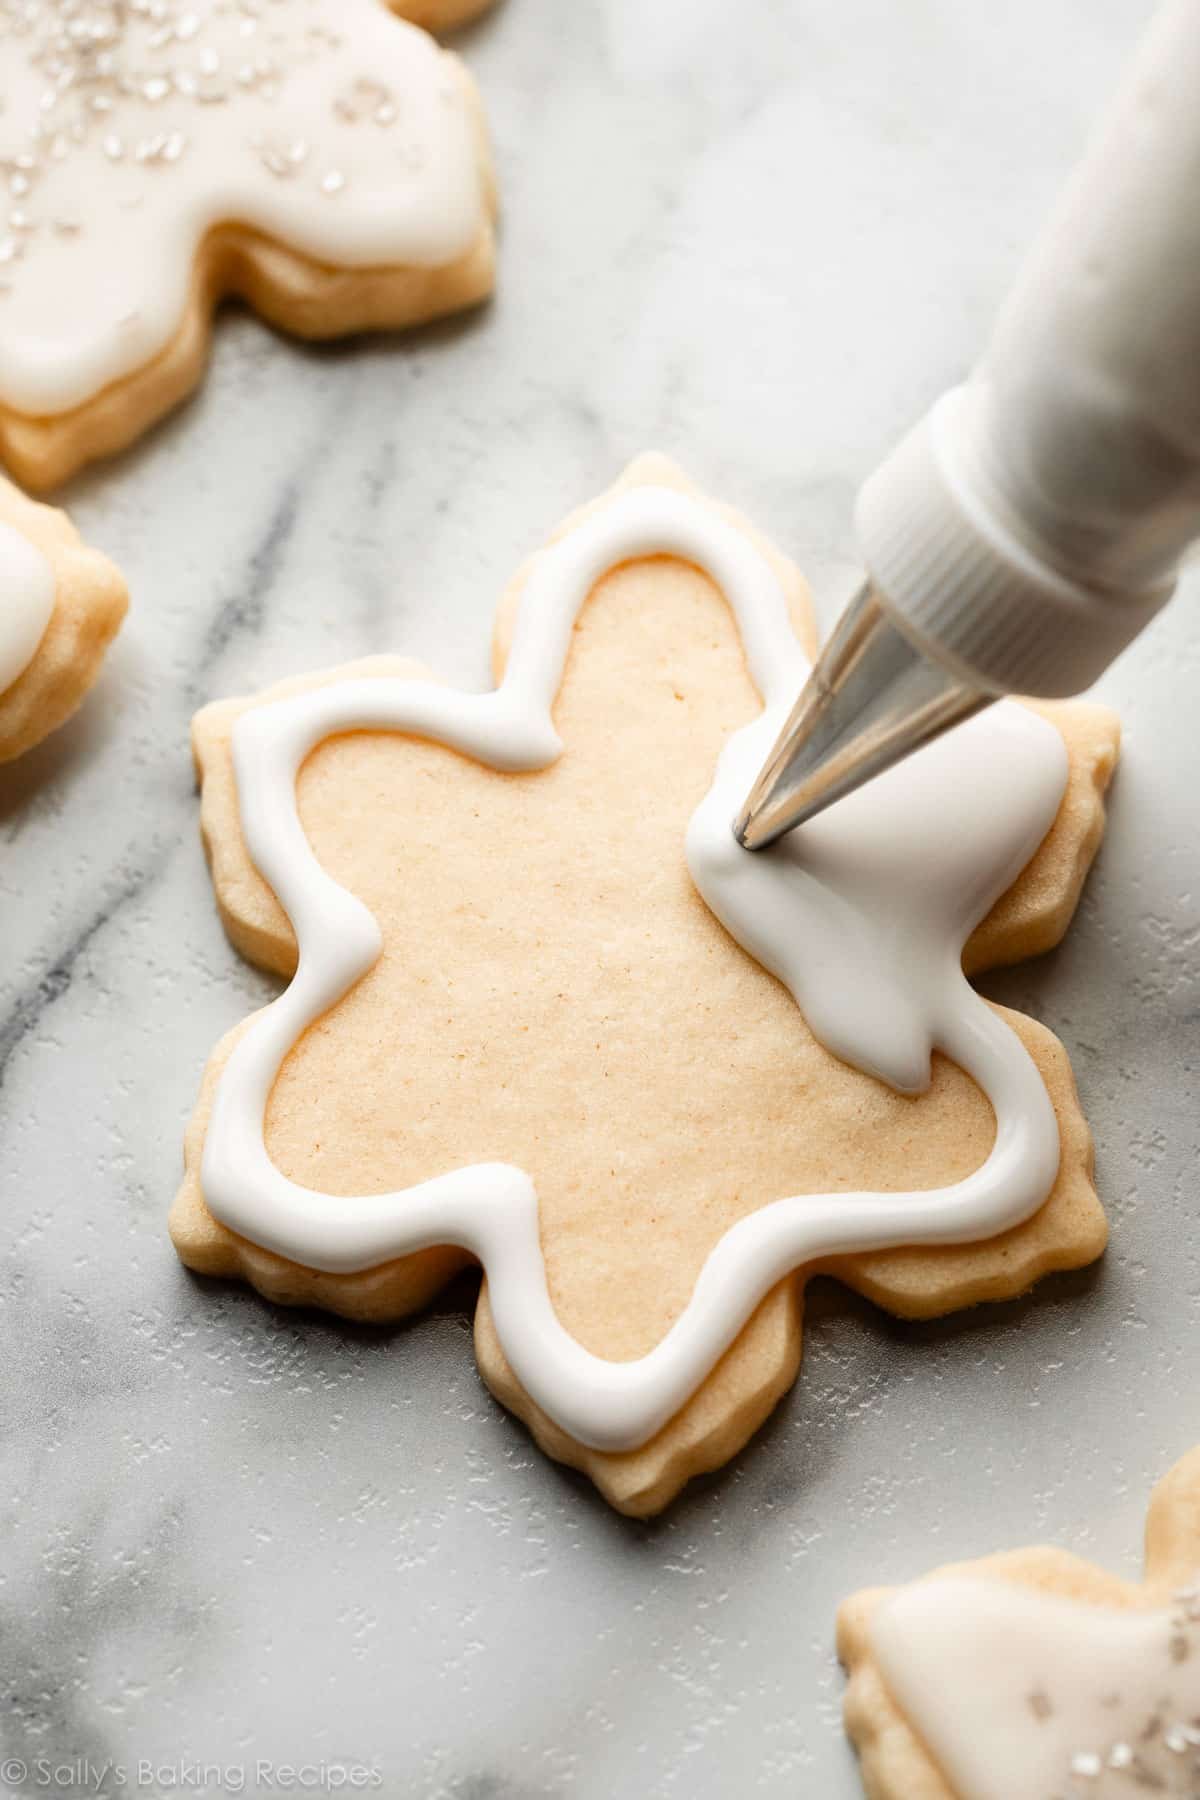
1. Flooding Icing: Piping a Single Layer of Icing
Let’s begin with essentially the most fundamental method: adorning with a single layer of icing.
First, pipe a top level view throughout your cookie. Then fill within the middle of the define—that is known as “flooding.” Go forward and add some sprinkles whereas the icing remains to be moist, as pictured on the snowflake- and sweet cane-shaped cookies beneath.

2. Piping Two Layers of Royal Icing
The subsequent technique is a double layer of icing, which suggests you pipe and flood the cookies and let that layer of icing set, after which return later to pipe some particulars on prime. Polka dots, stripes, swirls, or writing will stand out superbly with this technique. You may swap icing colours and/or piping ideas for a finer element.
Begin by piping and flooding the cookie with a layer of icing, identical to we did earlier than. Let that set for 1–2 hours, after which you possibly can pipe on a second layer of icing particulars as soon as the primary layer has dried. Once more, you possibly can velocity up the drying time by putting the iced cookies within the fridge.
So as to add some swirls on prime of the pictured coronary heart cookies, I switched piping ideas from the Wilton #4 to the smaller Wilton #2. A smaller tip will pipe a extra outlined and detailed design.

3. The best way to Pipe Icing in Outlined Sections
I like this look, as a result of in case you are solely utilizing one colour, it offers the icing some dimension. And for those who’re utilizing a number of colours, this technique retains the colours from bleeding collectively.
Begin with one colour, and pipe each different part or space of your cookie, then let it set earlier than you pipe the remaining sections/areas. For the pumpkin cookies, I define and flood the middle, after which the 2 sides, leaving area between every part. Let the icing dry for a minimum of half-hour.
As soon as the icing is semi-set, you possibly can go forward and fill the remaining sections with icing.
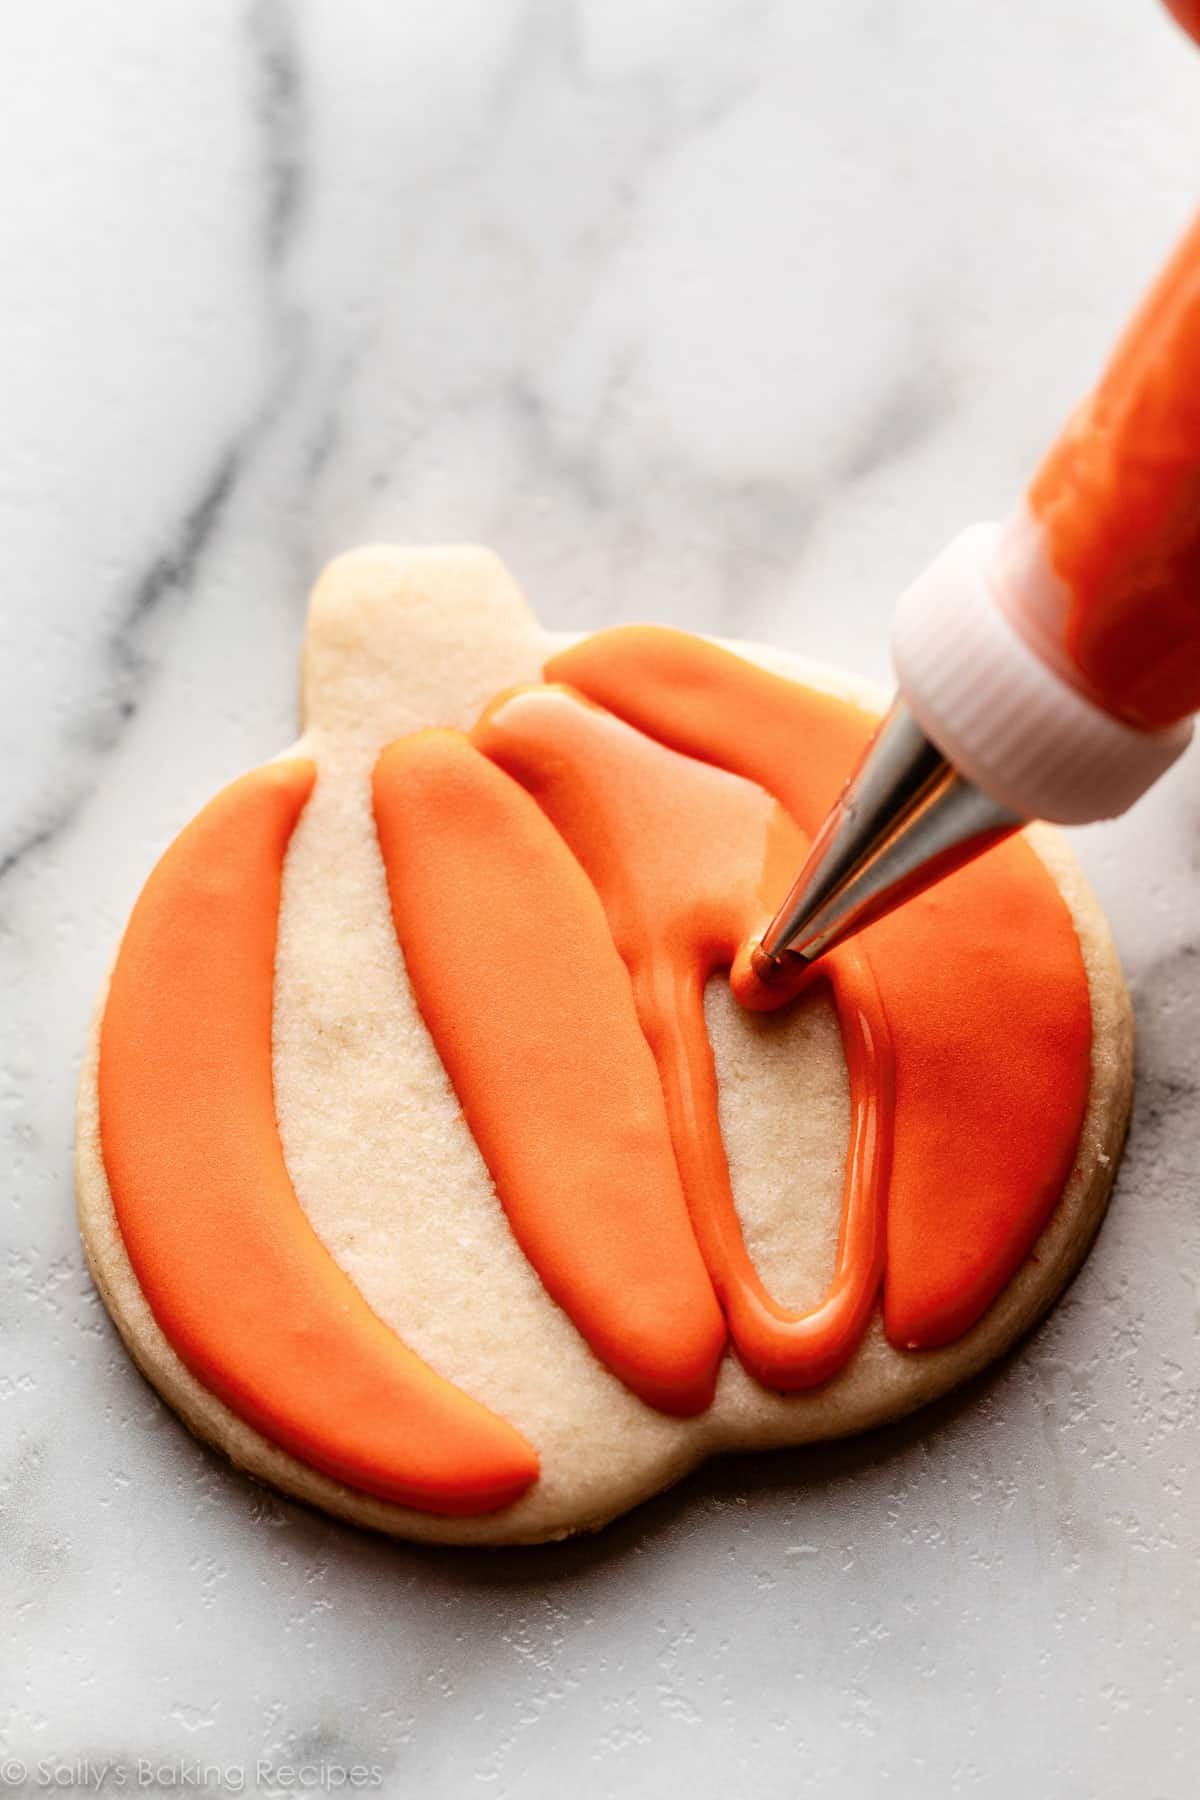

This “outlined sections” technique takes just a little extra time, however for those who’re adorning a whole lot of cookies, it’s possible you’ll discover that by the point you end piping the primary sections on all of the cookies, the icing could have set sufficient to begin piping on the remaining sections.
4. Piping in Sections + Sprinkle Dip
This system offers the cookie that very same sectioned look as above, however you don’t have to attend half-hour for the primary part to set.
Begin by piping on the part you need to cowl with sprinkles or glowing sugar. Dip the cookie into the sprinkles, in order that they fully coat the icing. Then pipe in your remaining sections. Once more, you possibly can swap colours right here for those who’d like, and also you don’t have to fret concerning the colours bleeding collectively as a result of the primary colour was lined in sprinkles.

For the flower cookies beneath, I used a mix of each strategies #3 and #4: I piped the circle within the middle first, after which dipped it in sprinkles. Then I piped on each different petal, and let these set earlier than going again and piping on the remaining petals.

Be certain that to observe the video tutorial beneath to see me reveal all of those strategies. I hope this publish and video helps you overcome any fears you might have about cookie adorning, as a result of even easy strategies could make for stunning cookies. Simply take your time and have enjoyable with it!
Cookie Adorning Instruments
Now you’re able to host a Cookie Adorning Day! 😉

4 Straightforward Methods to Adorn Sugar Cookies
Prep Time: 5 minutes
Cook dinner Time: 0 minutes
Complete Time: 5 minutes
Yield: 3 cups for two dozen cookies
Class: Dessert
Delicacies: American
Description
Right here is my traditional simple royal icing made with meringue powder, plus numerous methods to make use of it for adorning cookies. You should use this conventional royal icing for each flooding and outlining your cookies. Be certain that to observe the video tutorial beneath to see me reveal the adorning strategies.
Directions
- Put together: Watch the video on the best way to make royal icing so that you get an thought of what the ultimate consistency must be.
- Make the Icing: Pour sifted confectioners’ sugar, meringue powder, and 9 Tablespoons of water into a big bowl. Utilizing a hand mixer or a stand mixer fitted with a whisk attachment, beat icing substances collectively on excessive velocity for 1.5–2 minutes. When lifting the whisk up off the icing, the icing ought to drizzle down and easy out inside 5–10 seconds. If it’s too thick, beat in additional water 1 Tablespoon at a time. I normally want 10 Tablespoons, however on significantly dry days, I take advantage of as much as 12–14 Tablespoons. Remember that the longer you beat the royal icing, the thicker it turns into. In case your royal icing is just too skinny, simply maintain beating it to introduce extra air, OR you possibly can add extra sifted confectioners’ sugar.
- Colour the Icing: In case you’d prefer to tint the icing, divide it into separate bowls for every colour, or tint your complete batch one colour. A little bit gel meals coloring goes a good distance, so use a toothpick to dot the gel into the icing. Stir it in, after which add extra to deepen the colour if desired. Remember that the extra you stir, the thicker the icing turns into. If wanted, stir in a couple of drops of water to keep up the goal consistency.
- Fill the Pastry Bag: Match a pastry bag with a small spherical piping tip (and use a coupler for those who plan to modify icing colours and/or piping ideas), resembling Wilton piping tip #4. Fill the bag with icing, ensuring to depart a couple of inches of area on the prime of the bag. Twist to seal or use a clip.
- Adorn Your Cookies:
- Straightforward Flooding: Utilizing a small spherical piping tip resembling Wilton piping tip #4, pipe a top level view of icing throughout your cookie. Then fill within the middle of the define with extra icing. If desired, you possibly can add some sprinkles whereas the icing remains to be moist.
- Two Layers of Icing: Begin by piping and flooding the cookie with a layer of icing, simply as described above. Let that set for 1–2 hours, after which pipe on a second layer of icing particulars as soon as the primary layer has dried, resembling swirls, handwriting, dots, and different designs. A smaller piping tip, resembling Wilton piping tip #2, is right for intricate designs/particulars. Let the icing set once more earlier than you stack and retailer the cookies.
- Piping Outlined Sections: This look offers the icing ornament some dimension. Additionally, for those who’re utilizing a number of colours, this technique retains the colours from bleeding collectively. Begin with one colour, and utilizing Wilton piping tip #4, pipe each different part or space of your cookie, then let it set earlier than you pipe the remaining sections/areas. For the pictured pumpkin and tree cookies, I define and flood the middle, after which the 2 sides, leaving area between every part. Let the icing dry for a minimum of half-hour, till the icing has begun to set. As soon as the icing is semi-set, you possibly can go forward and fill the remaining sections with icing.
- Piping Outlined Sections + Sprinkles: This system offers the cookie that very same sectioned look as #3, however you don’t have to attend half-hour for the primary part to set. Utilizing Wilton piping tip #4, begin by piping on the part you need to cowl with sprinkles or glowing sugar. Dip the cookie into the sprinkles, in order that they fully coat the icing. Then pipe in your remaining sections.
- Let the Icing Set: When utilized to cookies in a skinny layer, royal icing fully dries in about 2 hours at room temperature. If icing consistency is just too skinny and runny, it is going to take longer to dry. If the icing is utilized very thick on cookies, it is going to additionally take longer to dry. In case you’re layering royal icing onto cookies for particular designs and want it to set shortly, place cookies within the fridge to assist velocity it up.
Notes
- Make Forward Directions: You may put together this royal icing 2–3 days forward of time. I like to recommend transferring it to a smaller bowl or container and tightly sealing for as much as 3 days within the fridge. Once you’re prepared to make use of it, let it come to room temperature, then combine it with a whisk a couple of occasions, as it could have separated. If it thickened, whisk in a couple of drops of water.
- Freezing Directions: Any leftover royal icing will be frozen for as much as 2 months. Place leftover royal icing into zip-top freezer luggage. In case you have greater than 1 colour, every colour must be in its personal bag. Earlier than sealing, squeeze as a lot air out of the bag as doable. Freeze on a flat shelf floor in your freezer. Thaw in a single day within the fridge and produce to room temperature earlier than utilizing once more.
- Freezing Embellished Cookies: Embellished sugar cookies freeze nicely for as much as 3 months. Anticipate the icing to set fully earlier than layering between sheets of parchment paper in a freezer-friendly container. Thaw within the fridge or at room temperature.
- Preserve Royal Icing Moist: Once you’re not working straight with the royal icing (for instance, you’re adorning cookies however you continue to have some icing left within the bowl that you simply intend to make use of subsequent), place a moist paper towel straight on the floor of the royal icing. This prevents it from hardening.
- Particular Instruments (affiliate hyperlinks): Electrical Mixer (Handheld or Stand Mixer) | Meringue Powder | Gel Meals Coloring | Disposable or Reusable Piping Luggage | Bag Clips or Ties | Couplers | Wilton Piping Tip #4 | Wilton Piping Tip #2
- Non-compulsory Flavors: Be at liberty so as to add 1/2 teaspoon of your favourite flavored extract, resembling lemon, orange, maple, peppermint, and so forth. once you add the water. Style after the icing comes collectively, then beat in additional if desired. You may as well use 1 teaspoon of vanilla extract.